The Transcendent Lobster Roll: A Worthy Splurge

imageFor months now I’ve been reading and hearing about the ubiquitous lobster roll–in Bon Appetit and Cook’s Illustrated magazines, and on TV shows like the Cooking Channel’s Eat Street. I must admit I’ve only eaten lobster on a cruise ship vacation; it is not something I can often afford. Plus, I live in the South and have always associated the lobster roll with Maine and seaside towns like Portland, Oregon. The concept of pairing lofty lobster with the all-American lowly hot dog bun, well, that’s just not something you see every day. So, over the weekend I sequestered myself in the kitchen and set out to make this mystery. I may be in Georgia, but with one bite, I was at a seaside shack on the upper East coast, toes in the sand.

image
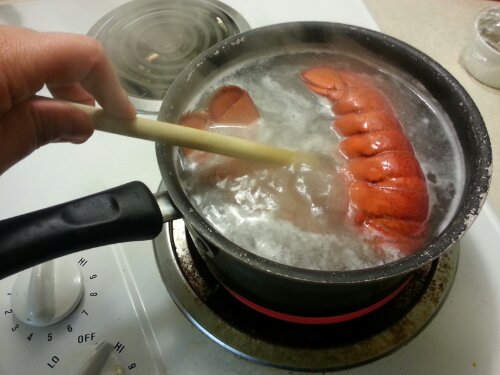
With a little help from the July & August edition of Cook’s Illustrated, the recipe was actually very simple. The most difficult part is getting the meat out of the lobster tail, but no worries. I’ll share a tip that makes it easy. I purchased two lobster tails for $18.95 from Ellis’ Meat Market here in Statesboro, then cooked them for 12 minutes in boiling salted water.

imageMeanwhile, I toasted two good ol’ Sunbeam white bread hot dog buns in butter and seasoned them with salt and pepper on each side. They didn’t know what to think.

imageI managed to get all my ingredients locally, which can never hurt. I picked up some lemons, green onions and celery from L&D Produce. Chop about two tablespoons of celery and a teaspoon of the onion. A little onion goes a long way, it shouldn’t overpower the lobster.

image
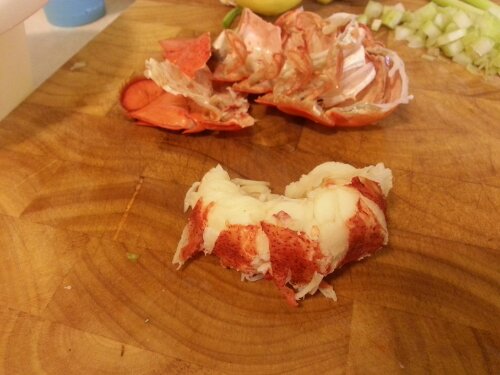
Once the lobster is finished cooking (you’ll know when a meat thermometer inserted in the thickest part of the tail registers 175 degrees), drain and let it cool. Be sure to take them out of the hot water. I forgot to do this and nearly burned myself cracking the shell because I was so excited to get to the meat. There is more than one way to skin a cat, but to keep the tail meat in one piece, Cook’s Illustrated recommends removing the meat by turning the lobster on its side, and pressing down with both hands until the shell cracks. Then, with the flippers facing you and shell facing down–thumbs on opposite sides–pull back to crack the shell and remove the meat. Works like magic. See? Dice lobster into 1/2 inch chunks.

imageNext, mix two tablespoons of mayo with a pinch of cayenne pepper, salt and pepper, and a splash of lemon juice. Toss in the green onion and celery. Mix well and add lobster meat. Toss to coat.

wpid-IMG_20130825_164422.jpg
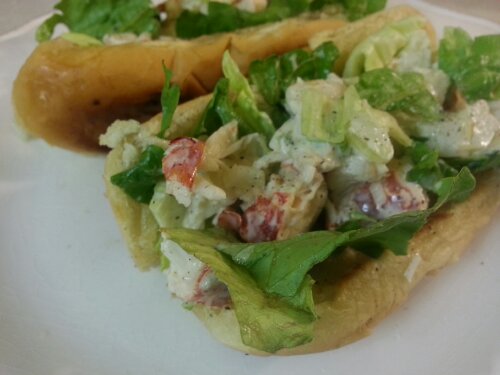
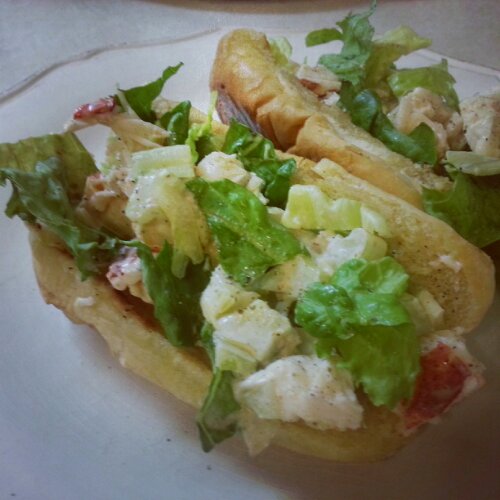
And now for the assembly. I used a lettuce trio including green leaf, iceberg and radicchio. Line the hot dog buns with lettuce. Then spoon lobster salad into the buns, until it’s spilling out and looking irresistible. Finish with a drizzle of melted butter and a final sprinkle of salt and pepper.

imageThe lobster roll is really the perfect, down home dinner party food around. It’s so approachable and unpretentious. That is of course, if everyone brings their own lobster. Ha! Serve it with potato chips or fries, whatever suits your fancy.

imageThe crunch of that toasted bun with the creaminess of the lobster salad is something to write home about. The lemon juice really brightens the flavor.

imageBon Appetit contributor Michael Paterniti says, “For me, the lobster roll is more than just culinary transcendence or proof that simple food made simply is the most soul-satisfying of all. It is summer itself, the baptismal rite after winter and mud season, a diary of days.” That sums it up.

Here’s a quick reference of everything you’ll need.

Lobster Roll Ingredients:

  • 2 tablespoons of mayonnaise (Preferably Dukes)
  • 2 tablespoons of minced celery
  • 1 1/2 teaspoons of lemon juice
  • 1 teaspoon of minced chives or green onions
  • Salt & Pepper
  • A pinch of Cayenne Pepper
  • 2 Cooked Lobster Tails, Chopped
  • Unsalted butter
  • Green leaf lettuce
  • Hot dog buns

Have you ever eaten or made a lobster roll?

Farmers’ Market Summer Bruschetta

Farmers’ Market Bruschetta is a summer staple.

Grape tomatoes are abundant at farmers’ markets this time of year, and I’ve got the perfect way to use them up! My recipe for Summer Bruschetta is a scrumptious starter course and makes one fine appetizer with drinks. Fun fact for ya: The Italian word Bruschetta translates to, “slice of toasted bread seasoned with oil and garlic.” If you’ve never cooked slices of bread in melted butter on the stove top, start living. There’s no time like the present!

I’m a firm believer in supporting Georgia farmers and shopping local whenever possible. All of the ingredients in my recipe are locally sourced, but can certainly be substituted wherever you live. I encourage you to visit a farmers’ market near you for fresh, local and nutritious ingredients! This recipe is simple, sweet and satisfying.

Learn more about the Statesboro Main Street Farmers Market and Tuesday Market in the Park.


Farmers’ Market Summer Bruschetta

Ingredients

  • 2 Tablespoons of Georgia Olive Oil
  • 6 cloves of garlic, minced
  • Half of 1 medium Vidalia onion, finely chopped
  • 2 pints red and yellow grape tomatoes, halved
  • Balsamic Vinegar to taste
  • 1 tsp sugar
  • 1 bunch fresh basil, separated into leaves, rolled up tightly and sliced (chiffonade)
  • Kosher salt and freshly ground black pepper
  • 1 Sugar Magnolia Bakery & Café Baguette
  • 1 whole garlic clove, peeled
  • 1 stick of butter

Directions
Heat olive oil in a medium skillet. Add garlic and onion and stir for about one minute. Pour into a mixing bowl and let cool slightly.

Add tomatoes, a splash of balsamic vinegar, sugar and basil. Season to taste with salt & pepper. Toss to coat. If time permits, refrigerate for one hour.  If not, it is fine to use immediately.

Cut the baguette into diagonal slices. Melt half the butter in the same skillet you used for the garlic. Cook the baguette on both sides until golden brown. Rub toast with one whole garlic clove while hot. Repeat with remaining butter and bread.

To serve, stir the tomato mixture and spoon generously over toasted baguette slices.

Special Event
You’re also invited to join me at the Statesboro Mainstreet Farmers’ Market this Saturday, Aug. 17, 2013 from 9 a.m. – 12:30 p.m. I hope you’ll stop by the Celebrity Chef tent to say hi and get a taste of my Summer Bruschetta! Be sure to listen out for my radio commercial (below) on air this week promoting the market.

Get the Local Vibe at 40 East Grill

40 East Grill
Statesboro, Georgia

Local restaurants are the jewels of small towns. You may have your go-to dish at a well-known chain, but exploring indigenous places to eat–that’s where the magic happens. The truth is, I love Red Lobster’s Seaside Shrimp Trio and the Crispy Chicken Tacos at Chili’s. I can’t go to Cracker Barrel without ordering hash brown casserole as my side dish. However, no matter where I travel, these great restaurants will only offer more of the same. To understand the real picture of a city’s culture, people and food, you’ve got to venture outside the chain-restaurant-comfort-zone. It’s there, at places like downtown Statesboro’s 40 East Grill, you’ll find homegrown flavors, and in this case, experience the true vibe of small town America with a modern twist.

wpid-20120927_114917.jpg

Offering lunch and dinner, 40 East Grill opened in August 2012. With a locally focused menu that changes every few months, they pride themselves on cooking with a fusion of native products featuring B&G Honey Farm, cheese from Flat Creek Lodge and beef produced by Southeast Georgia farmers. Chicken and seafood are other great options. My go-to lunch combo is She Crab Soup paired with the Three-Cheese Panini, pictured below. I often add a side of crispy sweet potato fries to round out the meal. My co-workers and I have made 40 East Grill a regular lunch stop. It makes for a fantastic date night too.

wpid-20120927_122226.jpg

The menu, presented on a clip board with a clothes pin, even includes fun drink choices outside the norm, like an Arnold Palmer (half tea/half lemonade) or blended coffee. Most recently, they’ve added a bacon, egg and cheese sandwich to the menu! That’s not something you see every day and that’s exactly what’s to love about 40 East Grill…it’s creative, classy and unpredictable. The restaurant’s best sellers include the Southern River Farms Ribeye , Chicken Pot Pie and the Maryland Style Jumbo Lump Crab Cakes topped with a lemon beurre blanc.

THE FOOD:


THE ATMOSPHERE: 


40 East Grill has a quaint, urban feel that’s trendy and warm with exposed brick throughout, a welcoming chalk board at the entrance that lists daily specials, original hardwood floors, earthy paint colors and modern lamp lighting. Outdoor seating is available with a great view of downtown Statesboro, onlooking the Emma Kelly Theater and Averitt Center for the Arts. Live music happens often too, varying from country, rock and bluegrass. Even the talent is local! Additionally, the ladies restroom is among the cutest I’ve seen complete with a luxurious crystal chandelier and vessel sink.

THE BAR:

Happy hour is every evening from 5 – 7 p.m. Stop in for a signature cocktail at the 18 foot copper top bar, like the 40’s Perfect Margarita or Cucumber Melon Martini. During Happy Hour, wells and house wines range from $2 – $3.  Not quite ready to go home? Stay for chicken parmesan or a 12-ounce bone-in, pan seared pork chop and watch a game on the flat screen TVs.

Wild Berry Pie filled with fresh blueberries and blackberries, topped with whipped cream cheese.  Photo credit: 40 East Grill.
Wild Berry Pie filled with fresh blueberries and blackberries, topped with whipped cream cheese.
Photo credit: 40 East Grill.

Aside from delicious food, the thing that sets 40 East Grill apart is the service. Time and again, I’ve been impressed by the servers’ attention to detail and willingness to go the extra mile. They’re consistently well dressed, friendly and accommodating. The restaurant is open Monday – Friday from 11 a.m. – 2 p.m. and 5 – 9 p.m., also on Saturdays from 5 – 9:30 p.m.

When quality like this exists in your own neighborhood, it’ll make you think twice before venturing out-of-town.

40 East Grill on Urbanspoon

Crack This: Farm Eggs vs. Store-Bought

I’ve eaten eggs from the grocery store my entire life. I’m sure at some point in my childhood I’ve tasted an egg fresh from the chicken coop because my Grandpa raised chickens, but that was before my palate was experienced enough to appreciate the difference. It’s true that when you’ve never experienced better, you don’t know what you’re missing.

wpid-IMG_20130510_185756.jpgSo, when my good lookin’ boyfriend showed up at my door last week with one dozen, light brown and cream-colored farm eggs in one hand and a beautiful bouquet of flowers in the other (I know…keeper), I set my sights on cooking the eggs just the way a farmer recommended: in a little bacon grease with salt and pepper. I’ve never tasted anything like these eggs…it was pure eggstacy (had to do it!). Seriously, the flavor is out of this world, and sure to make you crack a smile (okay, okay). During cooking I found them to be more fluffy than a store-bought egg. Produced by free-range chickens, farm eggs are more nutritious because the chickens are able to roam freely and eat a natural diet. They contain no added hormones or fillers and are not processed. 

wpid-20130520_195459.jpg

wpid-20130520_195545.jpgOne meal that exemplifies comfort food for me and really lets the farm egg shine, is the tried and true bacon, egg and cheese sandwich. A fancy meal has its time and place, but it’s not always the five-star, fine dining plates that trip my trigger. Sometimes, a good ol’ familiar meal is the only thing I need to feel centered, satisfied and one with my kitchen again. Served with a side of cheese grits, breakfast for dinner has never been better.

Here’s how I make the classic McDonald’s biscuit-turned-sandwich at home:

  • Thick cut, hickory smoked bacon
  • Nature’s Own Honey Wheat Bread
  • 2 Farm Fresh Chicken Eggs
  • Blackberry Jelly (I used homemade jelly from the Amish country that I got from a quaint market, but Smucker’s works great if you don’t have that).
  • Kraft’s Sharp Cheddar Cheese, sliced

Cook three strips of bacon in a skillet on medium heat until just crispy (I like mine slightly underdone). Remove from the pan and drain on paper towels. Pour off some of the grease, reserving enough to cook the eggs, about 1-2 tablespoons. Whisk the eggs together in a small bowl, season with salt & pepper. Pour the eggs into the pan and let set. Cook for about 2 -3 minutes on each side, flipping once for even browning. Meanwhile, slice or grate the cheddar cheese and toast two slices of bread. Spread toasted bread with blackberry jelly, then build the sandwich. Serve with a side of cheese grits for optimum enjoyment!

wpid-20130520_194926.jpgAnd remember, when building the sandwich, it’s all about good architecture! Somehow, the sandwich tastes better when cut into a triangle shape too. At least, that’s the way mama always sent me to school, with a neatly packed cut-in-half sandwich in my brown paper sack.

Have you ever tasted a farm egg? If so, how would you describe the difference?

Pot Pie Low Country Boil Style

100_7932

Here in the coastal plains of Southeast Georgia where flip-flops are perfectly acceptable in December, we don’t have many extremely cold nights during the winter season. So, over the weekend when the temperature got down to 22 degrees, dinner called for something warm and earthy. Inspired by an incredible photo in Bon Appetit magazine, I set out to make pot pie–only instead of using chicken, I served it up low country boil style with baby shrimp, roasted potatoes and canned corn, seasoned with none other than Old Bay.

Here’s what you’ll need to create my spin on the classic chicken pot pie:

  • Baby Salad Shrimp
  • Kale
  • Roasted Red Potatoes
  • Canned Corn
  • Chicken Broth
  • Splash of Red Wine
  • All-Purpose Flour
  • Green Beans
  • Chopped Onions
  • Puff Pastry or Pie Pastry
  • Old Bay Seasoning
  • Shrimp & Crab Boil
  • Salt & Pepper to taste

wpid-20130202_194626.jpgIt was like a Shepherd’s Pie remix. In the fridge, I had some red potatoes that I had roasted just a few days before and a few fresh green beans I needed to use up. This dish is fun because you can really use whatever you like. To start, pre-heat your cast iron skillet on medium heat with extra virgin olive oil. Saute the potatoes and chopped onions together, then throw in your remaining vegetables including the kale and cook, seasoning with salt and pepper as you go. Feel free to get creative.

wpid-20130202_195221.jpgOnce the vegetables have married together (for about 5 minutes or so), add in 1/3 cup of all-purpose flour, stirring constantly. Quickly add in your liquid. I deglazed my pan with a splash of red wine for flavor, then added in 2 cups of chicken broth, 1 cup at a time.

wpid-20130202_200359.jpgToss in your baby shrimp. They’re perfect because they’re already deveined and have no hulls. They make the perfect bite! Bring everything to a simmer. It will thicken up nicely. Almost done!

wpid-20130202_200416.jpgI used pie pastry. Sit the dough out on the counter for about 15 minutes before unrolling. With a rolling pin, smooth out any creases. Then, slap that puppy over that beautiful filling in your cast iron skillet, letting the dough drape over the sides. Whip one egg with about a teaspoon or so of shrimp & crab boil. Brush it all over the pastry. Just enhances the flavor! 😉

wpid-20130202_200710.jpgCut four slits in the dough, so the steam can escape. Dot it with butter. Then pop that puppy in the oven at 425 degrees for 15 minutes. Turn the heat down to 350 degrees for another 15 minutes until the top is a rich, golden brown.

100_7922What’s not to love about pie pastry and warm, comforting vegetables with all the flavors of the coast? An added bonus is easy clean up! It’s a one pot meal that feeds an army.

100_7933A glass of red wine like Cabernet Sauvignon or Shiraz will compliment the dish nicely and when consumed together, they’ll leave you longing for snow.

Roasted Winter Fruit Brings A Pop of Color To Your Thanksgiving Table

Not dressing up the meal with color is like sending someone out of the house without clothes” – Japanese proverb 

With Thanksgiving less than a week away, dreams of green bean casserole, sweet potato souffle and pumpkin pie have been dancing in my head. I’m always looking for an unexpected, colorful side dish to add to the table though, and my Honey-Roasted Butternut Squash dish fits the bill. Often pureed for soups and casseroles, butternut squash is a winter squash with a sweet, nutty taste similar to its cousin pumpkin. The hardest part about this recipe is peeling and dicing the squash, which really isn’t hard at all.

You’ll need a sharp knife and a vegetable peeler.

Remove the peel from the hour-glass shaped gourd.

Then scoop out the pulp. The butternut squash has a yellow skin and an orange, fleshy pulp. The squash becomes sweeter and richer as it ripens.

Dice the squash into 1-inch cubes and place in a single layer on a baking sheet.

Drizzle the squash with extra virgin olive oil and honey, then sprinkle with kosher salt and freshly ground black pepper. Also, throw in a few unpeeled cloves of garlic for added flavor.

Roast the squash at 450 degrees for 30 minutes. Serve it up by adding a little butter, then finish the dish with a sprinkle of kosher salt. My Honey-Roasted Butternut Squash is sure to melt in your mouth and provide a nice pop of color for your plate!

Check out the health benefits of eating this power food from Whole Living.

An Autumn-Inspired Pork Chop Package

wpid-20121023_203126.jpgAt the start of each new season, there are a few dishes I anticipate cooking greatly. My Apple-Pecan Honey Stuffed Pork Chops in White Wine are at the top of the list in the fall. Apples, onions, pecans and nutmeg exemplify autumn in this comforting, home-cooked meal. It starts on the stove top and finishes in the oven. Special enough for company and simple enough for a weeknight, these tender, juicy pork chops put chicken and beef to shame. It ought to be a crime to eat this good!

Let’s get cookin’! Here’s what you’ll need:

  • 3-4 thick cut pork chops
  • Salt, pepper and nutmeg seasonings
  • 1-2 Tbs honey
  • 1 medium granny smith apple
  • 1 small Vidalia onion
  • 1/2 cup pecans
  • Unsalted butter
  • White wine of your choice, I used Pinot Grigio

Pre-heat your oven to 350 degrees. Start by dicing a granny smith apple, an onion and your pecans. Be sure to dice them up small, keeping them the same size for even cooking. A smaller dice will also make your pork chops easier to stuff.

Melt a tablespoon of unsalted butter in a large skillet over medium-high heat. Add in the diced apples, onions and pecans, season with salt and pepper and dot with butter. Cook for a few minutes, then drizzle in some honey for a touch of sweetness.

Meanwhile, prepare your pork chops. Season both sides with salt, pepper and a little nutmeg. Rub it in good.

It’s really important to get a thick cut pork chop for this recipe. They should be at least a 1/4 of an inch thick.

You’ll need a small, sharp pairing knife to make the incision. Cut them right down the middle, keeping the back and sides of the pork chop intact but making a large enough incision to create a good size pocket. Don’t be scared. Own it!

By this time, your stuffing will be ready. With a large serving spoon, fill each pork chop to the brim. Pack the stuffing in there, getting down in the crevices. Don’t overfill them, but make sure each one is plump. If you put too much stuffing in the pork chops, it’ll just fall out during cooking. You want them to hold as much as possible. Just remember, deep pockets do the trick. You can use toothpicks to secure them, but I find they just get in the way.

In the same pan (easier clean up and building flavors – winning), melt another tablespoon or two of unsalted butter. Gently lay your stuffed pork chops in the pan and brown on each side for 3-4 minutes until the outsides are golden brown and caramelized. When you flip them, handle with care. You will lose a little stuffing, but don’t fret. Before transferring to the oven, hit the pan with a good splash of white wine and inhale. 😉

Finish cooking the pork chops in a 350 degree oven for 15 minutes. I find it much easier to finish a thick cut of meat in the oven than on the stove top. The meat cooks evenly and you don’t have to worry about one side getting darker than the other or constant flipping. Plus, you’re not standing over the stove and you can take a moment to sip some wine or devote your attention to side dishes.

They taste phenomenal–warm flavors of nutmeg and pork compliment tart apples in every sweet and savory bite. Don’t forget to drizzle the chops with the pan juices. Having one of these on your plate is like having your own little gift. You’re also getting fruit, protein and vegetables all in one little package. What’s not to love?

A sweet potato or brown rice are a pork chop’s friend.

Feel free to change-up the stuffing. Rosemary is awesome with pork. Don’t like pecans? Use walnuts. Even if pork is not in your diet, chicken is always an alternative. The idea is to have fun and experiment with flavors. Enjoy!

What are your favorite fall meals?

Related Content:
Skillet Barbecued Pork Chops Good Enough for Company

The Best Crab Cakes in The World

Some folks say “Yum!” Some let off a long, low “mmmmmm.” Me? I praise the Lord. I mean, I have church. It’s the perfect bite that brings it out of me. It can happen anywhere–in a restaurant, at my mama’s table. When I taste it, the words just naturally roll off my tongue. Crunch. Thank you holy Jesus. Taste. Glory to your name Father. Swallow. Halleluiah. It’s not every time I eat, but when it happens, you’ll know. I raise my hands in praise and get the oddest looks from those around me. When I made these crab cakes, it happened.

This is what a crab cake should be. This my friends, is the best crab cake in the world. If heaven were a taste, you’re looking at it. Made up of lump crab meat and a few spices with only an egg white to bind everything together, the flavor of crab meat is the main event. No saltines, no breading–this is a true crab cake. Inspired by the King of the Lowcountry himself, the late beloved writer Pat Conroy, this recipe comes from “The Pat Conroy Cookbook.”

Any good cook will tell you, a beautiful meal starts with the finest ingredients. Prosser’s Wholesale Shrimp is a hidden gem in Brooklet, Georgia. It’s where the locals go to get wild Georgia shrimp, crab legs, crab meat and all the fixin’s for their lowcountry boils. It’s where I went to get my crab meat. Even while I shopped, the owner’s father was shrimping on the Southern seacoast.

At the Statesboro Mainstreet Farmers’ Market, I picked up some homegrown hot peppers and a bunch of garlic chives. I seeded and chopped the pepper, and it gave my crab cakes a nice kick and punch of color.

Combine one pound of lump crab meat with chopped pepper and garlic chives, then season with cayenne pepper, freshly ground black pepper and kosher salt.

Beat one egg white lightly and pour over the crab mixture.

Fold everything together gently. Once the crab meat has absorbed the egg white and is sticky to the touch, sift one tablespoon of all-purpose flour into the mix.

The recipe makes eight cakes. They are very fragile. To form the cakes, divide the crab mixture into eight balls. Then flatten each one slightly with the palm of your hand. Season each one with a little more kosher salt. Refrigerate the cakes for at least an hour.

Combine a teaspoon of peanut oil and about a tablespoon of butter in a skillet and let it get hot. This is the secret to a beautiful, crunchy crust.

Gently lay the crab cakes in the skillet. I put my first one in the pan as if it were a hamburger and it immediately crumbled. It’s all good though, because you’ll have eight chances to get it right. When you flip them, a small flat spatula will make the job easiest. Keep them very close to the bottom of the pan and be as delicate as possible. Not going to lie, flipping crab cakes is a stressful experience. Here’s the good news: they’re edible no matter what their shape. 😉

Serve them on a bed of greens with lemon wedges, a side of grits and a cold glass of sweet tea. It’s sure to be a lowcountry experience no matter where you live.


Recipe Recap
Excerpted from “The Pat Conroy Cookbook” by Pat Conroy copyright © 2004

Pat Conroy’s Crab Cakes

Ingredients

  • 1 pound lump crabmeat, picked over and cleaned, with all shell fragments removed
  • 1 egg white, lightly beaten (until just foamy, not stiff)
  • 1 tablespoon all-purpose flour
  • 2 tablespoons fresh chives, finely snipped
  • 1 teaspoon freshly ground black pepper
  • 1/4 teaspoon cayenne pepper
  • 2 teaspoons coarse or kosher salt
  • 3 tablespoons unsalted butter
  • 2 teaspoons peanut oil
  • Lemon wedges

Cooking Directions

Place the cleaned crabmeat in a medium mixing bowl. Pour the egg white over crabmeat slowly, stopping occasionally to mix it through. When the crabmeat has absorbed the egg white and feels slightly sticky to the touch, sift the flour over crabmeat and sprinkle the chives, black pepper, cayenne, and 1 teaspoon of the salt evenly over the top. Lift the crabmeat from the bottom of the bowl, turning it over gently, to mix the ingredients without overhandling.

Separate the crabmeat into 8 equal portions and gently roll each between the flattened palms of your hands to form loose balls. Flatten slightly and transfer to a plate. Sprinkle both sides liberally with the remaining 1 teaspoon salt and refrigerate for at least 1 hour before cooking.

Line a baking pan with paper towels. Fry the crab cakes in two batches to ensure a crisp crust. Using a small (8-inch) heavy skillet that conducts heat well, melt half the butter and oil together until the mixture is foamy and begins to brown. Carefully place the crab cakes in the hot fat and fry until a crust forms, turning only once, about 2 minutes per side. (The fat should be sizzling hot, enabling a crisp crust to form before the crab absorbs the cooking fat. This is the Southern secret to perfect crab cakes.) A small pastry spatula (with a thin tongue) will make lifting and turning the delicate crab cakes a lot easier. Remove the crab cakes and drain in the prepared pan. Cover loosely with aluminum foil to keep warm while you make the second batch.

Carefully pour off the cooking fat from the first batch, wipe out the pan, and return it to the heat. Prepare the second batch of crab cakes using the remaining butter and oil.

Serve hot with lemon wedges. Makes 8 crab cakes.


New to Some Kinda Good?

Thumbnail

Georgia native Rebekah Faulk Lingenfelser is a freelance writer, entertainer and food enthusiast who writes and speaks about her love of good food and the Coastal South. A Season 2 Contestant on ABC’s “The Taste,” she is the former Statesboro Herald food columnist and past host of the television program “Statesboro Cooks.” From 2012 – ’14, she appeared regularly as Celebrity Chef at the Statesboro Main Street Farmers’ Market and wrote as a guest blogger for Visit Savannah and The Local Palate. In addition, her work is published in Moments magazine and Connect Statesboro. Her culinary accomplishments are recognized in two publications: She is a featured alumna in Georgia Southern Magazine (Spring ’14) and the “Go Girl!” in Moments magazine (March 2104), a tabloid for moms and modern women. To learn more, visit RebekahFaulk.wix.com/RebekahFaulk.

Homemade Pimiento-Cheese, A Revelation

 “Juicy tomatoes and pimiento cheese are dreamy together. Especially when they’re in bite-size form.” Denise Gee, Porch Parties

If I’m being honest, my memories of pimiento cheese are not fond. The words alone make me envision those store-bought, orange-colored round tubs that my grandma kept faithfully on the second shelf of the refrigerator growing up, at eye level next to the sweet tea. I will never forget her spreading that unappetizing orange substance between two pieces of white bread. Fortunately, however, making pimento cheese at home takes on a whole new meaning. This Southern classic is really nothing more than a combination of garden-fresh vegetables and delicious cheeses bound by mayonnaise and seasoned to taste. It’s really quite versatile–spread it on crackers, use it to top off your hamburger or in this case, fill up plump cherry tomatoes.

This recipe was inspired by Porch Parties, a fantastic entertaining book I picked up on St. Simons Island. With only a few ingredients, the most time-consuming part about it is slicing the tomatoes and removing the pulp. You’ll need a small onion, 3 fresh garlic cloves, some jalapeno peppers, cherry tomatoes and of course a 7 ounce jar of sliced pimientos. As for the cheese, you’ll use a 1/2 pound of yellow mild cheddar and 1/2 pound of white sharp cheddar, shredded. The mixture is then seasoned with white pepper and held together with a cup of mayonnaise.

A pimento or cherry pepper is a variety of a large, red, heart-shaped chili pepper that’s sweet, succulent and more aromatic than the red bell pepper. In my grocery store, they were located on the international aisle with the salsa, not on the aisle with the pickles and olives, like you might think.

Slice off the stems of your cherry tomatoes, then with a melon baller, scoop out the pulp. You’ll need about 24 tomatoes.
While the tomatoes drain on paper towels, remove the seeds and the veins from your jalapeno peppers, de-skin the onion and hull your garlic cloves. Quarter the onion to help your food processor out, throw everything in and give it a whirl…

They smell really good all diced up! Drain the vegetable mixture to get rid of the natural water from the peppers and onions. This will help your mixture to be less runny.

Meanwhile, shred up your cheeses.
Combine the drained pimientos and the chopped vegetables with the cheese. Then add in your mayonnaise. The recipe called for 1 cup, but in hindsight, I would’ve only added about half. I ended up adding more cheese to balance things out. I am not a fan of mayonnaise so, if you’re like me–there’s good news! You can’t taste it. The mayonnaise really just serves as a binder, the taste is very subtle. Season generously with white pepper and a little salt.

Put about a teaspoon of the mixture in each cherry tomato halve, then top them off with slivered jalapeno peppers. They make such pretty, colorful bites and are fun to serve.

Be sure to try the spread on crackers too.

The jalapeno-pimiento cheese stuffed cherry tomatoes are sweet with a little heat and the flavor of the sharp cheese is a nice bite. On the next go ’round, I’ll make just a few tweaks: include less mayo, cut back on the onion, include more cheese–add Wickles.

What’s your take on pimiento cheese? If you’ve never made it at home, give it a chance!

Start the Day at Palmer’s Village Cafe

Palmer’s Village Cafe
St. Simons Island, Georgia

Breakfast on vacation. It’s probably my favorite meal. Whether you rise with the sun or sleep until 10 a.m., the food at Palmer’s Village Cafe on St. Simons Island will motivate you to get up and moving. They take pride in their ingredients and present plates with no detail undone. I’ve never been when there isn’t a crowd and that’s because, where there’s good food, you’ll find people.

I appreciate the thoughtfulness of the menu items. There aren’t many places you can go to find an omelet with crab meat and homemade pimento cheese garnished with grilled, pickled okra. The dishes are regional too, like the Coastal Delight: an open-faced whole egg omelet topped with goat cheese, sautéed shrimp, spiced pecans and arugula. The breakfast items range from $3.95 to about $12.

Smack dab between the Island hardware store and a small real estate company on Mallery Street, locals and vacationers fill the seats at Palmer’s. It’s my favorite place to start the day on the Island.

I ordered the Challah Bread French Toast served with Palmer’s Village Cafe signature maple syrup. You won’t find Aunt Jemima here. The Fresh Fruit side dish had juicy orange segments, sliced bananas and red strawberries.

Now, y’all didn’t think I forgot the meat, did you? Not just bacon or sausage…country ham. Salty and seasoned just right. That’s what I’m talkin’ ’bout!

 Artwork by local artist Cathie Parmelee decorates the walls and is available for purchase.

This is my favorite piece.

Colorful coffee mugs bring in fun pops of color.

Open for breakfast and lunch Tuesday – Sunday from 7:30 a.m. – 2 p.m., you’ll feel welcome from the moment you step inside the creaking front door. No matter how busy Palmer’s may be, the staff members will make sure your coffee cup is full and you’ve always got everything you need.

Palmer's Village Cafe on Urbanspoon